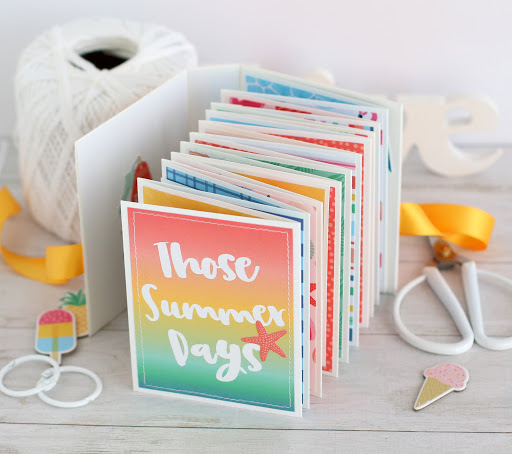
Девочки, всем привет! Выполняю давно обещанную просьбу опубликовать пошаговые фотографии для создания мини альбомчика в стиле "аккордина". Меня не раз спрашивали на Инстаграме об этом, и я обещала что сделаю. А к вам потом вернусь с новым постом:))
Hello friends! So happy you stopped by here! Today I want to share with you a little step-by-step tutorial on how to create an accordion style mini book. The photos are pretty much self explanatory, but I will add just a brief explanation for each one :) For this mini album I used the Dive Into Summer paper collection by Echo Park Paper.
I have made a few of these before in different sizes, but this particular mini book is pretty small and it measures only about 3.25" x 4.25". You can make your accordion style mini book any size you want by following a few simple steps:
Cut six 4 x 9.5" strips of white cardstock. I used 8.5 x 11" cardstock and needed three full sheets for this step. You can make more or less pages if you desire.
Score each strip of paper at 3", 6" and 9", fold and crease each scored line alternating sides as shown in the photo.
Connect all folded strips by adhering 0.5" flap to a "full" page. Trim off 0.5" flap on the last page. Both front and back should have a full page. Your connected piece should look like this:
Cut a bunch of journaling cards and patterned papers that measure slightly smaller then 3 x 4" (I like to leave white borders around). Adhere these pieces of patterned paper to cover all pages in the accordion except the last one, alternating colors. You may add stitching to some of the pages.
Trim a 6.25" x 9.5" piece of white cardstock. Score on the long side of cardstock at: 1", 4.25", 5.25", 8.5". Turn the paper and score at: 1" and 5.25".
Using scissors, trim off corners as shown in the photo. Fold all scored lines inside and glue them down. This step will make your mini book cover a little sturdier.
After adhering all of the flaps inside, you will get a mini book cover as shown in the photo above. Add glue to the back of the last page of the accordion pages and adhere it inside of the cover (to the right side of the cover).
Adhere two pieces of ribbon to the front and back of the mini book cover with glue dots. Cover all sides of the mini book cover with pieces of patterned paper - two pieces should measure about 3 x 4" and one 0.75 x 4", leaving thin white border around. Add stitching if you like and cover inside of the cover with a piece of white cardstock.
Finish decorating the mini book with stickers, chipboard, ephemera pieces and enamel dots! Fill your book with photos and stories. Repeat:))
Here are a few more shots of the finished mini book:
You can create similar mini books by changing themes and colors, by making them long or a square. As always, there are so many options in paper crafting!
Thank you so much for visiting! And I really hope this tutorial was a helpful:) If you get any questions, don't hesitate to ask! I will try my best to answer any of them if possible.


Классный альбомчик!
ОтветитьУдалитьСпасибо, милая! Может не такой красный как легкий и быстрый, а это всегда крассно:))
Удалитькакой он яркий! :) и самое главное лёгкий в исполнении, когда что-то срочно нужно соскрапить.
ОтветитьУдалитьАня, спасибо за МК, сделала по нему альбомчик, очень здорово и просто всё получилось!
ОтветитьУдалить